There is a post (STM32 And Custom USB HID Device? Yes Please!) that gets a lot of attention, although at the time it was created, only vague “how-to” was presented. I decided to break down this to smaller parts of modifying STM32 USB HID code, generated with STM32CubeMx. Here is an example of a basic – default code, which turns out to be USB HID mouse, and a guide how to transform this code to keyboard. STM32L100 discovery board was used for test.
Update (31.5.2020): see the latest project with STM32 + USB + AHK here!
Default USB HID device with STM32CubeMx
- Intialise all peripheral: USB, HSE, SWD, button (to send USB reports), leds (just for testing purposes).
Note 1: USB in general need a proper reliable clock. In my case, I used 16MHz external oscillator.
Note 2: Initialise USB as Full-Speed device, as Human Interface Device Class. This is a template HID mouse, that works straight out of the box and is instantly recognised by PC when connecting USB cable.
Note 3: Button and LEDs are optionall. Button for triggering sending USB reports and LEDs for status. - Export project, build and upload.
When this is done, connect your usb cable to PC and wait for OS to initialise device. It should show as additional Mouse device under “Mice and other pointing devices”.
You might wonder where this mouse came from. Lets take a look on CubeMX generated files:
- USB device library/Middlewares
– usbd_core.c (provides all USB device core functions)
– usbd_ioreq.c, usbd_ctlreq.c (provides the USB IO requests)
– usbd_hid.c (provides everything to interact with USB host, send reports, …) - Application files:
– usbd_conf.c (provides low layer / HAL functions)
– usbd_device.c (provides initialising function called from main())
– usbd_desc.c (provides USB device descriptors)
More about file hierarchy can be found in chapter 2 of STM32Cube USB device library user manual. It is wise to get familiar with basics of USB before you get on to more serious work.
There is no “singe file/function” to implement USB mouse like arduino: Mouse.begin(). But with a little knowledge and look-around, you can find all USB HID specifics in this files:
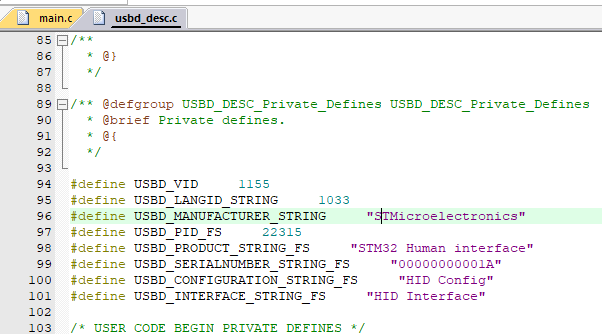
- USB VID/PID in usbd_desc.c
You can change this defines but be carefull when changing VID and PID, since PC uses the VID/PID combination to find the drivers for this specific device. Also, VID is something usb.org manage and costs around 2000€ to obtain your own Vendor ID. I suggest to leave VID/PID for the time of testing.
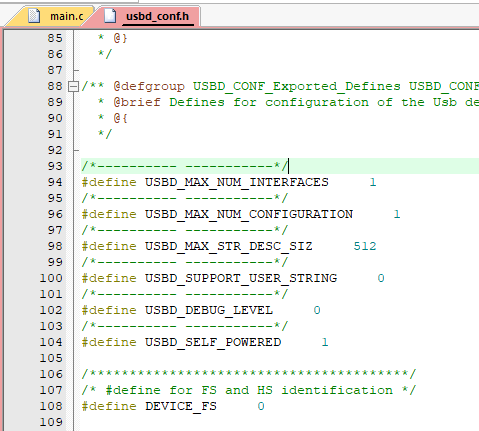
 - USB configuration defines in usbd_conf.h
This is set with CubeMX so don’t change this defines.  Descriptor sizes in usbd_hid.h
- USB struct handle in usbd_device.c
- USB device/report configuration in usbd_hid.c
This is the file that holds all informations about what kind of a USB device this is, how its reports will look.
As you can see, “default” file explains where our mouse (detected by PC) came from. In fact, mouse itself is merged into one report containing buttons and “joystick” – axes (X, Y, wheel)!
We can learn more about this “default” implemented device by exploring device descriptors in this file (usbd_hid.c). The “important” ones are:
- USBD_HID_CfgDesc[USB_HID_CONFIG_DESC_SIZ]
This is USB HID device Configuration Descriptor – defines general device informations about power, number/type of interface/s … Code is quite neatly commented by default. - HID_MOUSE_ReportDesc[HID_MOUSE_REPORT_DESC_SIZE]
This is an description of all interface reports so the host can know what to expect. This descriptors are sent to host at initialisation and host afterwards expect data – called reports – as they were set here.
There are “standards or guidelines” for different USB HID devices like mouse, keyboard, joystick, … and therefore drivers can be generalised amongs manufacturers. As there are no comments in this descriptors, we can ask Google for what this descriptor tell us:
0x05, 0x01, // Usage Page (Generic Desktop Ctrls)

0x09, 0x02, // Usage (Mouse)
0xA1, 0x01, // Collection (Application)
0x09, 0x01, // Usage (Pointer)
0xA1, 0x00, // Collection (Physical)
0x05, 0x09, // Usage Page (Button)
0x19, 0x01, // Usage Minimum (0x01)
0x29, 0x03, // Usage Maximum (0x03)
0x15, 0x00, // Logical Minimum (0)
0x25, 0x01, // Logical Maximum (1)
0x95, 0x03, // Report Count (3)
0x75, 0x01, // Report Size (1)
0x81, 0x02, // Input (Data,Var,Abs,No Wrap,Linear,Preferred State,No Null Position)
0x95, 0x01, // Report Count (1)
0x75, 0x05, // Report Size (5)
0x81, 0x01, // Input (Const,Array,Abs,No Wrap,Linear,Preferred State,No Null Position)

0x05, 0x01, // Usage Page (Generic Desktop Ctrls)
0x09, 0x30, // Usage (X)
0x09, 0x31, // Usage (Y)
0x09, 0x38, // Usage (Wheel)
0x15, 0x81, // Logical Minimum (-127)
0x25, 0x7F, // Logical Maximum (127)
0x75, 0x08, // Report Size (8)
0x95, 0x03, // Report Count (3)
0x81, 0x06, // Input (Data,Var,Rel,No Wrap,Linear,Preferred State,No Null Position)
0xC0, // End Collection

0x09, 0x3C, // Usage (Motion Wakeup)
0x05, 0xFF, // Usage Page (Reserved 0xFF)
0x09, 0x01, // Usage (0x01)
0x15, 0x00, // Logical Minimum (0)
0x25, 0x01, // Logical Maximum (1)
0x75, 0x01, // Report Size (1)
0x95, 0x02, // Report Count (2)
0xB1, 0x22, // Feature (Data,Var,Abs,No Wrap,Linear,No Preferred State,No Null Position,Non-volatile)
0x75, 0x06, // Report Size (6)
0x95, 0x01, // Report Count (1)
0xB1, 0x01, // Feature (Const,Array,Abs,No Wrap,Linear,Preferred State,No Null Position,Non-volatile)
0xC0, // End Collection
You can spend hours googling what each line means, how can different things be implemented, … `For a start, if we take “mouse usage”:
0xA1, 0x00, // Collection (Physical)
0x05, 0x09, // Usage Page (Button)
0x19, 0x01, // Usage Minimum (0x01)
0x29, 0x03, // Usage Maximum (0x03)

0x15, 0x00, // Logical Minimum (0)
0x25, 0x01, // Logical Maximum (1)
0x95, 0x03, // Report Count (3)
0x75, 0x01, // Report Size (1)
0x81, 0x02, // Input (Data,Var,Abs,No Wrap,Linear,Preferred State,No Null Position)
… we can see, our mouse has 3 physical buttons, each with logical state either ‘0’ or ‘1’. Part of report to send button presses is 3 bits long, padded with constant 5 bits to fullfill one byte.
0x95, 0x01, // Report Count (1)
0x75, 0x05, // Report Size (5)
0x81, 0x01, // Input (Const,Array,Abs,No Wrap,Linear,Preferred State,No Null Position)
Since this is single interface, single report device, USB host expects fixed report length (number of bytes), so in order to send mouse click to host, we must send exact number of bytes as this descriptor defines. I counted (1 byte for buttons, 3 bytes for X, Y and wheel, and 1 byte for motion wakeup) 5 bytes altogether.
Now, let’s implement mouse click for a test before we implement our keyboard.
- We will obviously need an array of bytes in size of 5 bytes – report:
#define CLICK_REPORT_SIZE 5
uint8_t click_report[CLICK_REPORT_SIZE] = {0};
All zeroes means there was no change in any of report fields.
- We need to add our usb data structure to main.c file, so we can pass it to functions. We can find it in usb_device.c and reference it in main.c as:
extern USBD_HandleTypeDef hUsbDeviceFS;
- We must send clicks. In order to avoid sending clicks until reset, use your button or large delay.We must send button press and release. A certain amout of time must pass by before new report can be registered by host driver/OS.
HID_FS_BINTERVAL, /*bInterval: Polling Interval (10 ms) in USBD_HID_CfgDesc[USB_HID_CONFIG_DESC_SIZ] (usbd_hid.c) */
- Code in
while(1)inmain():
if(HAL_GPIO_ReadPin(USER_BUTTON_GPIO_Port, USER_BUTTON_Pin) == GPIO_PIN_SET){
  HAL_GPIO_WritePin(USER_LED_1_GPIO_Port, USER_LED_1_Pin, GPIO_PIN_SET);

  click_report[0] = 1; // send button press
  USBD_HID_SendReport(&hUsbDeviceFS, click_report, CLICK_REPORT_SIZE);
  HAL_Delay(50);

  click_report[0] = 0; // send button release
  USBD_HID_SendReport(&hUsbDeviceFS, click_report, CLICK_REPORT_SIZE);

  HAL_Delay(200);

  HAL_GPIO_WritePin(USER_LED_1_GPIO_Port, USER_LED_1_Pin, GPIO_PIN_RESET);
}
Unplug USB cable, upload code, plug it in and click 🙂 There it is, our STM32 USB HID mouse. I strogly recommend that you do this mouse example before modifying example to keyboard.
Implement USB HID Keyboard
- USBD_HID_CfgDesc[] and USB_HID_CONFIG_DESC_SIZ
In order to set up host for keyboard device, we must edit this configuration decriptor. Beside comments, only line:
0x01, /*nInterfaceProtocol : 0=none, 1=keyboard, 2=mouse*/
… is changed to 0x01 which is keyboard. Size remains the same.
HID_MOUSE_ReportDesc[] and HID_MOUSE_REPORT_DESC_SIZE
This is where we must fill data about keyboard report descriptor. Since USB HID keyboard is very well defined, we can find our report descriptor on google or we can build it from ground up using official USB HID Descriptor tool. Anyway, this is how report descriptor looks now:
0x05, 0x01, // USAGE_PAGE (Generic Desktop)
0x09, 0x06, // USAGE (Keyboard)
0xa1, 0x01, // COLLECTION (Application)
0x05, 0x07, // USAGE_PAGE (Keyboard)
0x19, 0xe0, // USAGE_MINIMUM (Keyboard LeftControl)
0x29, 0xe7, // USAGE_MAXIMUM (Keyboard Right GUI)
0x15, 0x00, // LOGICAL_MINIMUM (0)
0x25, 0x01, // LOGICAL_MAXIMUM (1)
0x75, 0x01, // REPORT_SIZE (1)
0x95, 0x08, // REPORT_COUNT (8)
0x81, 0x02, // INPUT (Data,Var,Abs) //1 byte

0x95, 0x01, // REPORT_COUNT (1)
0x75, 0x08, // REPORT_SIZE (8)
0x81, 0x03, // INPUT (Cnst,Var,Abs) //1 byte

0x95, 0x06, // REPORT_COUNT (6)
0x75, 0x08, // REPORT_SIZE (8)
0x15, 0x00, // LOGICAL_MINIMUM (0)
0x25, 0x65, // LOGICAL_MAXIMUM (101)
0x05, 0x07, // USAGE_PAGE (Keyboard)
0x19, 0x00, // USAGE_MINIMUM (Reserved (no event indicated))
0x29, 0x65, // USAGE_MAXIMUM (Keyboard Application)
0x81, 0x00, // INPUT (Data,Ary,Abs) //6 bytes

0xc0 // END_COLLECTION
This is generated with official HID tool, altogether 8 bytes, with new descriptor size of 45 bytes (update HID_MOUSE_REPORT_DESC_SIZE).
How keyboard report descriptor should look and what each byte means… Google it. There is a ton of information about it, so it really shouldn’t be a problem.
Renaming (optionally, just as an example):
- HID_MOUSE_ReportDesc to HID_Keyboard_ReportDesc
- HID_MOUSE_REPORT_DESC_SIZE to HID_KEYBOARD_REPORT_DESC_SIZE
- CLICK_REPORT_SIZE to PRESS_REPORT_SIZE
- Update this define to 8 (bytes – acordingly to descriptor).- click_report[] to press_report[]
- Edit main.c:
press_report[2] = 7; // send 'd'
Note: third byte (index = 2) in report descriptor is a first key byte out of 8 report bytes. Also, update “release” index to 2.
Note 2: ‘d’ is 7 acordingly to http://www.usb.org/developers/hidpage/Hut1_12v2.pdf page 53.
Again, unplug, build, upload, plug back and voila! ‘d’ as ‘domen’, the legend.
What’s next, composite STM32 USB HID device?
Anyway, here are project files for Keil uVision (.zip):
STM32 USB HID mouse generated with STM32CubeMx
Modified STM32 USB HID example to USB HID keyboard
Useful links to start with usb:
STM32 USB device library manual
Official USB page (HID descriptor tool)
USB in a nutshell – learn USB step by step with this great page
HID usage tables (descriptions for creating report descriptors)
It seems like here is almost the same example already described. doh. Anyway, this seems like a nice blog, full of useful informations, check it out!