This is a post about what we think is the right approach to make an indestructible cases for your DIY projects.
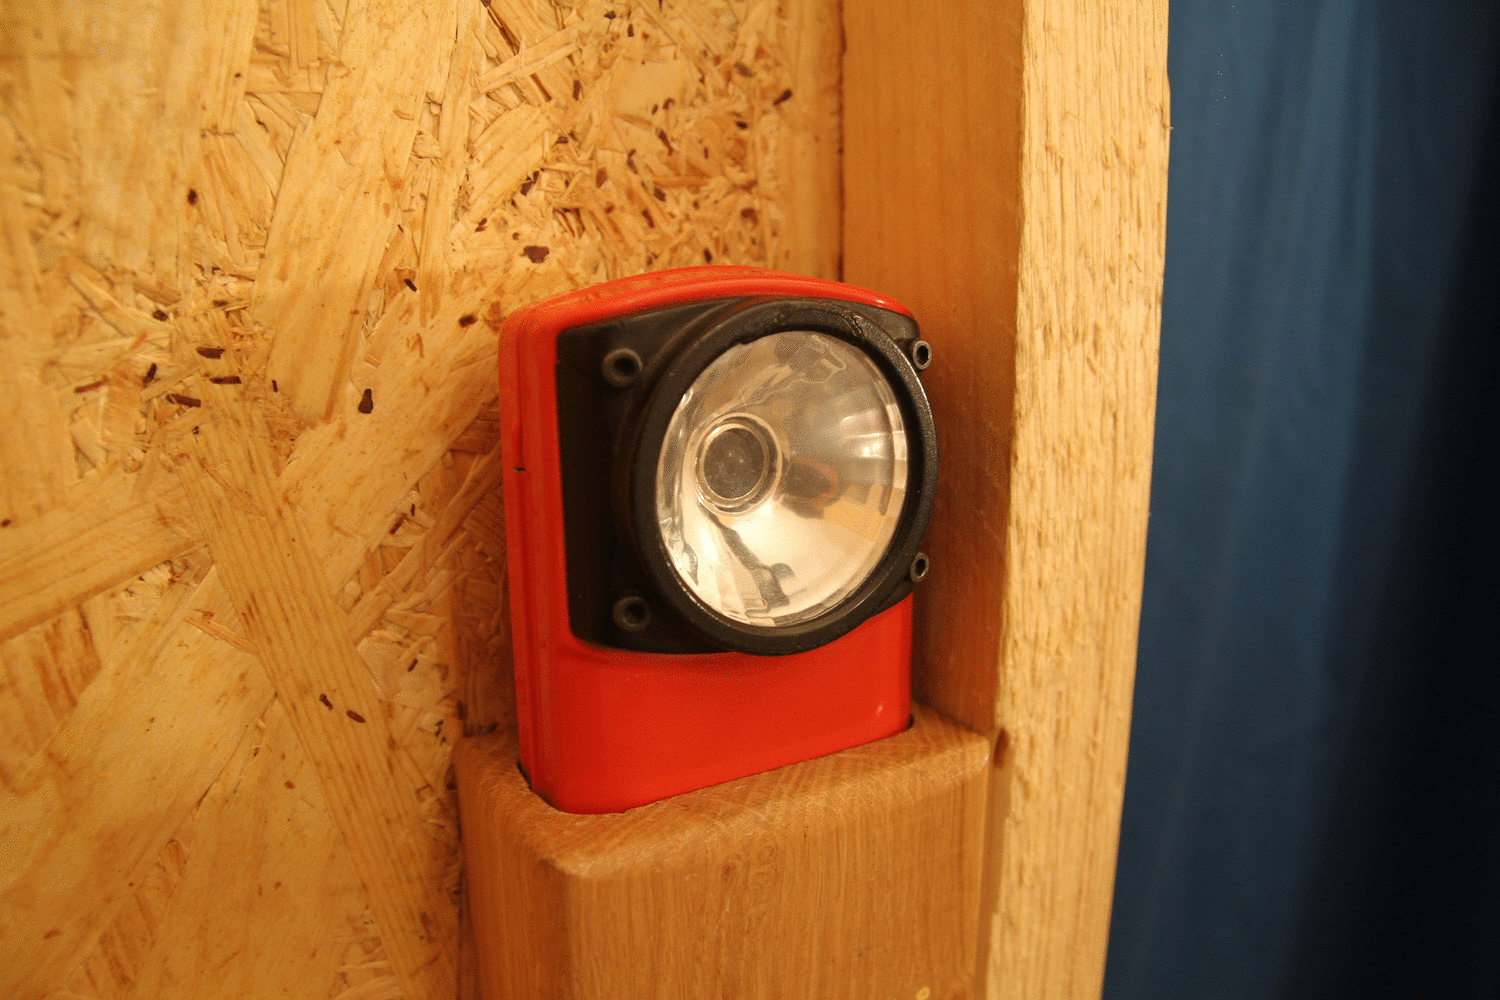
Imagine this scenario: take a group of people and lock them in a room. Give them a flashlight and tell them that the only way out of this room is up the ladder and through a huge tangled maze which is in a complete darkness. And when they process this fact and calm down just a little bit, say that each one enter the maze on his own and the time he has is limited – there is a countdown timer at the back of the flashlight. When it reaches zero, flashlight will turn off – wherever they are. Then leave the room and see what will happen to the flashlights and other stuff.
Read more about this project here.
As you might think, people often lose their shit in there and of course, they completely forget that things in real life must be used with certain care. For instance, we don’t usually throw cell phones from the roof just to save time while someone is calling. But in this case, with timer countdown reaching zero and “what will happen in darkness” attitude, people forget these flashlights must also be handled with some care. So here is a few words about how we did the most rugged “smart” flashlight available and how you should do your own indestructible housings.
For the game purposes this was needed (10 flashlights):
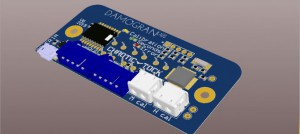
Electronics: LED light source, 3-digit timer countdown, rechargeable li-ion battery, RF control, ID switch selection, power button. (As this post is more case-related, feel free to ask anything in comments below or email us.)
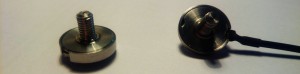
Housing: a magnet for triggering external reed relay and a case that will withstand all human abuse, except water.
I hate doing enclosures and boxes for my electronic stuff. It turned out that a proper housing of my DIY electronic projects took the same (or more) amount of time than the development of electronics itself.
A Bad Approach To Indestructible Housings
The idea was to take something cheap and readily available and modify it to suit our needs. It is possible but unlikely to work well. First version of flashlight was designed based on a vintage-looking flashlight with a rugged metal housing, modified locking system with a metal screw (to ensure players wouldn’t turn the flashlight off) and a plastic front plate to protect the LED. It was a great looking flashlight that was brutally torn apart in a couple of weeks/months.
There were many problems, here are some of them:
- Cheap plastic = cheap plastic. All plastic reflectors around LED bulb were broken after a few drops. Aditional screw holes only make it worse (weakened structure).
- Metal can be robust, but not thin sheet metal. Thin sheet metal bends and all sorts of problems are introduced (paint cracks, glue cracks, squeezed electronics…).
- Making 10 rectangular holes for timers, even in thin sheet metal is very hard. We used dremel tool and it took ages, not to mentin how our hands hurt after the 10th flashlight.
- When modifying existing cases you can’t just pull out everything that is in there. Some things must be kept where they are or you have a hole in housing.
PCB + wiring

A Good Approach
There is no quick & easy way when creating indestructible quality housings (or in general quality stuff). We decided to create our own design, tailored to our needs. There were two most obvious choices for us: 3D print or CNC.
There are pros and cons for every one of them. 3D print is easily available, and fully filled, it can be quite robust. But it is not cheap, specially for so many big parts (10 flashlights) and really slow. Also surface finish can be bad and precision can be an issue. Home CNC on the other hand can work with better (more resistant) materials, it is a lot more accurate and it is cheaper (or is it?). Cons are that there are many many tricks which can easily ruin whole product in a moment, there is a lot of work and tools needed…
Anyway, we decided to use our Cene the CNC since this is what we have and therefore is the cheapest option. We bought 12 mm and 15 mm polyethylene plastic plates just large enough to fit in CNC workspace, make our G-code and panelise the design, so the process was as fast as possible. You can read more about how to mill plastics here.
Front panel, inside (back view)
")
Generally, a couple of things you should pay attention to while designing indestructible housings:
- Spend a little more time thinking and a little less doing.
- Avoid sharp 90° edges, since they will be damaged on first dropdown.
Rather than that, think about how you can prevent visual (and real) damage, designing a nice rounded or 45° edges. - Avoid glue.
Sometimes glue can be a good thing (for example, hot glue is very elastic and does not crack, but also doesn’t stick materials together well), but most of the time it represents only aditional work, unreliable joints and costs. And if surface is bending or vibrating, glue can crack and fall off completely. - Make it simple.
This sounds trivial, but it isn’t. By simple I mean two pieces that are somehow connected together to form a robust housing. A good idea is to create a case cover in such way that it is embedded into the main U-shaped base housing. Avoid case covers that overlap base housing since this is the first thing that will be damaged and a case might not open anymore. - Overlapping and cover positioning.
Tolerances are always a tricky part when DIYing. A 0.5 mm gap looks large gap on a screen but then in reality you get a +/-2 mm gap that should be filled or cut away. Our tools have its limitations and flaws, and humans always do mistakes, so design housings with a little larger tolerances and position parts together with extra round pins/holes/position slots/edges/…. A good idea is to build a two piece housing that fit together tightly and precisely even before screws are screwed to hold it together. - Do not forget about cables and connectors.
As it might seem really obvious, we often underestimate wiring, switches and external modules. Try to look ahead and reserve additional space for these things. For example, it is much better to have a little longer battery cables neatly organized at the edge of your housing (possibly with extra mounting clamps) than short cables across all case, PCB and other components. - How will you mount battery or LED?
Again, think ahead. Maybe glue or double sided tape will do its job, but avoid improvising as much as you can. Prepare holes/slots or spaces to fit modules inside (like battery, which has fixed size). Take double sided tape thickness into account. - Convenience
Make all buttons, switches and LEDs accessible and protected. In our case we switched from hardware power switch to push-button and then we used software low-power mode. With this approach we avoided opening housing every game, button was on PCB (no wires) and properly hidden/protected from players. If switch or something is used frequently, make a proper strenghtening and shaft protection. - Robustness
Think of a pencil/screw driver/keys and see what wrong can you do with them, since homo sapiens rarely use brains in a critical situations. Are there any unneccessary holes or slots where this items can be stuck?
Bottom line:
Think more, do less. Do not underestimate what can happen, since there exists a gentleman called Murphy. Keep it simple, but not too simple. High-tech quality and robust products are never cheap and quick.