Let there be a script that makes blockMesh usage much, much easier to use. It shall be called classy_blocks. If you don’t know it yet, take a quick scroll through the readme file on github, then come back for an easy tutorial.
Installation
Recently, classy_blocks has become a python package so it can be installed with pip. It is not yet available on pypi but pip doesn’t care, just use the github address:
pip install git+https://github.com/damogranlabs/classy_blocks.gitThen, all relevant tools are available by import classy_blocks as cb. We’ll stick to this convention for all examples and tutorials.
A Simple Example
Face
Sketches in CAD are usually a starting point for a model and can be of arbitrary complexity. Here, however, the geometry must be strictly divided into hexahedral blocks, therefore the starting sketch here is always a quadrangle. It can be non-planar and can have curved edges, but that’s it.
Create a Face by specifying 4 points in space. Remember to order them correctly; face’s normal defines their order using the right hand rule.
base_points = [
    [0, 0, 0],
    [1, 0, 0],
    [1, 1, 0],
    [0, 1, 0]
]
base_face = cb.Face(base_points)

Extrude
extruded_block = cb.Extrude(base_face, 1)
will create a block of size 1x1x1.
Patch Names
Each block has 6 sides, named bottom, top, front, back, left, right. It should be quite intuitive to tell which is which. base_face, for instance, defines the bottom, and so on.
Suppose our block represents a box with no lid. The top patch will therefore represent atmosphere. There is something going on at the bottom so we will use a different name for it.
extruded_block.set_patch('top', 'atmosphere')
extruded_block.set_patch('bottom', 'floor')
extruded_block.set_patch(['left', 'right', 'front', 'back'], 'sides')
Chopping: Setting Cell Counts and Ratios
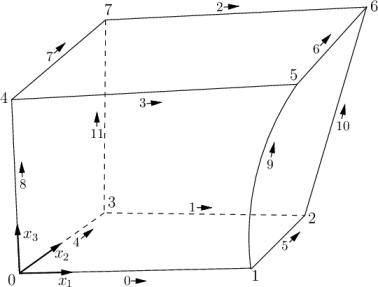
As with blockMesh, each block defines 3 local directions, 0, 1, and 2. Direction 0 runs from the first point of base_face to the second, direction 1 from the second to third. Direction 2 is the direction of extrude.
Now you have to set cell count and grading for all three directions of the block. In blockMeshDict you have to know count and first-to-last cell size. Here, classy_blocks allows you to specify one or two values which will be automatically converted to what blockMesh needs:
count: direct count specification (all cells are of the same size)start_size: set cell size and calculate (all cells are of the same size)start_size,c2c_expansion: useful when you need to specify a boundary layer and growth ratio (cell-to-cell expansion)start_size,end_size: useful when you need to connect a near-wall block to internal mesh with known cell sizecount,total_expansion: the same numbers blockMesh uses.
Those are just a few examples; you can actually use any combination of the above parameters. Of course, as long as count and total_expansion can be calculated from them. Suppose we need thinner cells near the bottom:
extruded_block.chop(0, count=10)
extruded_block.chop(1, count=10)
extruded_block.chop(2, start_size=0.01, c2c_expansion = 1.1)
The Mesh by classy_blocks
At this point we have defined our block throughout. We only need to add it to the mesh and write everything down.
mesh = cb.Mesh()
mesh.add(extruded_block)
mesh.write('system/blockMeshDict')
Now run the script and see what it does:
python make_mesh.py
blockMesh
Have fun until next time! Then, we’ll take a look into curved edges and operations. If you’re impatient, take a look at the examples directory in the repository.