Context
If you’re creating a multiregion mesh and you found this article you probably already know what SALOME , OpenFOAM, snappyHexMesh and chtMultiRegionFoam mean. In case you dont’ here’s a quick explanation:
- OpenFOAM is your favourite open-source CFD package,
- chtMultiRegionFoam is the OpenFOAM solver for conjugate heat transfer simulations,
- conjugate heat transfer analysis calculates heat flow between solid and fluid regions of the problem,
- SALOME is a tool for prepairing geometry for snappyHexMesh (fun fact, it has nothing to do with Oscar Wilde – it means Simulation numérique par Architecture Logicielle en Open source et à Méthodologie d’Évolution ),
- snappyHexMesh is the OpenFOAM’s meshing tool,
- multiregion mesh is what should come our of snappyHexMesh but almost never does and
- humans share about 50% of DNA with bananas.
The Usual Way
Suppose you get the model you’d like to analyse in a STEP assembly. You can’t just convert every part of it to STL because interfaces between regions (that is, parts) must match perfectly triangle-by-triangle. You have to go through all these steps:
- Import the STEP assembly model to SALOME Geometry module. The result is usually a compound.
- Explode the compound to separate solids.
- Create a box for the domain, if needed (depends on your meshing setup later in the process)
- Make a partition of all the parts in steps 2 and 3. This is the step that creates extra surfaces/edges where different parts/domains meet.
- Explode the partition back to solids.
Alternatively, instead of creating more solids, one could create face groups. Then, instead of creating submeshes in step 7 one would use those groups to create separate STL files for each domain. However, in my experience this did not work on complex domains. In particular, some of the faces were unexplicably missing from groups. - Create a 2D mesh on the partition.
- Create submeshes on solids from step 5.
- Export submeshes.
- Prepare surfaceFeatureExtractDict for every domain, blockMeshDict and snappyHexMeshDict.
- Finally, run snappyHexMesh to get your multiregion mesh.
Obviously, there is a lot of clicking involved. It takes forever even for cases with low number of domains. Let alone all the errors we humans are happy to make along the way.
The Quicker Way
How about this:
- Import settings.py
- Import create_groups.py
- Import create_stl.py
- Start meshing.
An Example
Model
I have prepared a simple model of a weird transformer. Suppose we’d like to do some cooling analysis on it. The model looks like this:
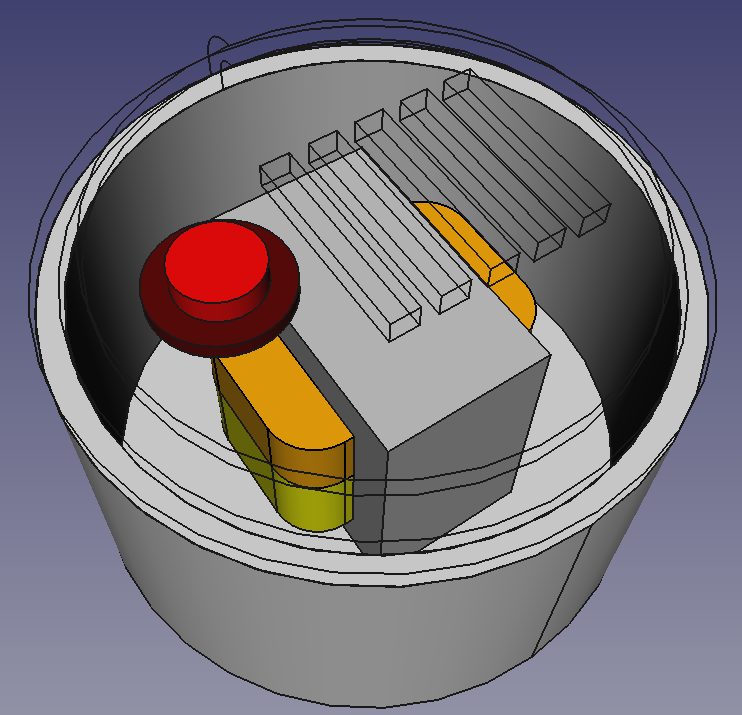
It has:
- aluminium housing,
- iron transformer core,
- two copper windings,
- plastic lid with cooling slots
- and a button (which we’d rather not include in our simulation).
You simply export the whole model as a single STEP file to the model/ directory.
Settings
Next, you open settings.py file. Edit paths of input and output directories and path to your model. The create_domain option creates and triangulates the outside but you don’t really need that because you can do it with blockMesh. Set that to False and ignore the next three settings (box, box_tr and bg_mesh_size).
The list names regions should match your names in model. Each list entry contains object_name, a regular expression matching all step parts in your input assembly and group_name, a string naming your final STL file.
The list exclude_objects contains regular expressions for models you don’t want to include. In our case, that’s the button since it makes no difference and no sense anyway.
SALOME
Now open SALOME and click File > Load Script... or press Ctrl+T. Load settings.py and nothing will show up. This just adds the variables into memory. Then, import create_groups.py. This will be more verbose.
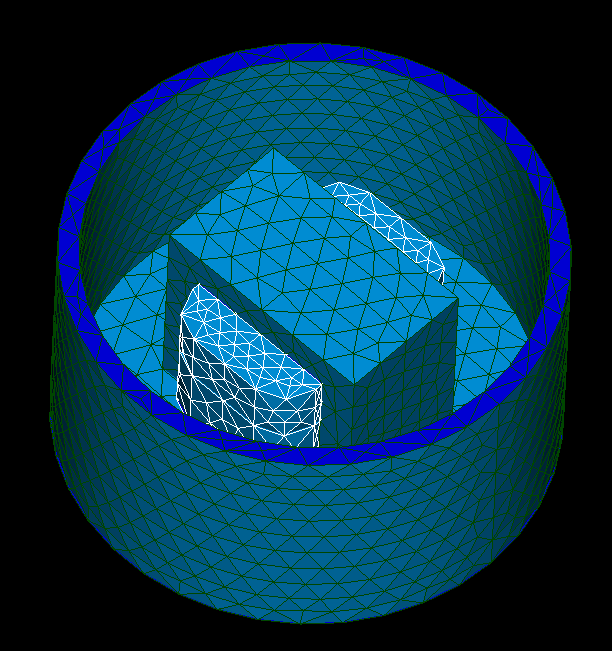
If you activate the geometry module you’ll see all the created objects. Notice the partition and its child objects – their surfaces are split where the models touch each other.
Before you import the last script, create_stl.py, it may be a good time to edit meshing settings. Depending on the size and complexity of your models you should choose MEFISTO or NETGEN algorithm and set max and min size of 2D elements. On import, the script will make a master mesh on partition and go through created partitioned objects, creating submeshes. It will export STL files to output directory in settings and let you know if it was successful.
Notes
This was written in SALOME 9.+, where I encountered two bugs:
- STL format: if you’re using decimal comma instead of dot, STL will be written with commas, thus unreadable to other programs. A simple search/replace would do but be very careful. Text editors usually don’t like huge files (I use Visual Studio Code which worked fine on whatever I needed so far).
- Saving failed: You can only do the above procedure once, then you have to restart SALOME. STL files somehow get locked and are not re-writable unless SALOME is closed.
SALOME also exports STL files without naming of regions (patches). You don’t need those for chtMultiRegionFoam (unless you do). Just to maintain consistency of snappyHexMeshDict files, I still name STL regions, even if there’s always only one. The convert_stl.py file does that. It’s just a copied script from these shortcuts.
All these scripts could probably be automated entirely and run from a console. But of course it’s never that simple – SALOME modules are not among your local Python libraries so I guess it needs quite a bit of wrestling to get the job done. However, I didn’t bother with that because I still want to see the results before starting meshing.
I also bothered to write scripts that write surfaceFeatureExtractDict and snappyHexMeshDict files with all regions and their respective refinements, fvOptions files with heat dissipation, blockMeshDict and even boundary conditions. My advice would be: don’t do that unless you’re expecting a great number of similar simulations. It’s easier and faster to set up a case by hand because most of the settings stay the same. In the end you spend more time debugging the so-called automated scripts instead of focusing on important stuff.
Your Files
are here: salome-multiregion.zip. Enjoy!