In Part 3 of this classy_blocks tutorial I mentioned that classy_blocks and blockMesh are not CAD software so they can’t produce the same surfaces. In order to obtain the exact form we want, blockMesh offers a very powerful but poorly documented tool: projections.
Available Geometry
There are two kinds of geometry that OpenFOAM currently understands: searchable and triangulated surfaces.
Searchable Surfaces
The former are geometrical entities that can be described with a handful or parameters (sphere, cone, plane, box, …). If you used snappyHexMesh you should know at least a few of them. Luckily, blockMesh understands them just as well. Unluckily, each OpenFOAM version supports a little different set of those. You’ll have to get to know your version a little better. Here are some links to start with:
- ESI-CFD: https://www.openfoam.com/documentation/guides/v2112/doc/guide-meshing-snappyhexmesh-geometry.html
- Foundation: https://cpp.openfoam.org/v10/classFoam_1_1searchableSurface.html
- Extend: https://sourceforge.net/p/foam-extend/foam-extend-5.0/ci/master/tree/src/meshTools/searchableSurface/
Triangulated Surfaces
Those are plain old STL or OBJ files (and others) that users can provide. They can be exported from CAD and are the most general kind. Alas, they have some drawbacks:
- Models of very high precision will require huge amounts of triangles – high space usage.
- Low-precision models can cause bad meshes.
- They cannot be parametrically defined.
With those surfaces there’s always a compromise between size and accuracy; usually there are no problems on high-Re meshes with no boundary layers. However, when one wants extra-thin boundary layers, bad triangulation can cause illegal cells on the wall.
Put your triangulated surface files in constant/geometry.
Specification in classy_blocks
There’s no real difference between specifying a surface in blockMesh or in classy_blocks. If blockMesh requires this:
box_wall
{
    type searchablePlane;
    planeType pointAndNormal;
    point (-1 0 0);
    normal (1  0  0);
}
Then classy_blocks requires:
geometry = {
    "wall": [
        "type searchablePlane",
        "planeType  pointAndNormal",
        "point (-1 0 0)",
        "normal (1  0  0)",
    ],
    "roof": [
        "type triSurfaceMesh",
        "name roof",
        "file 'roof.stl'",
    ],
}
Note that you don’t need semicolons at the ends of lines; everything else is quite the same, except it’s packed in Python dictionaries.
Projecting Stuff to Things
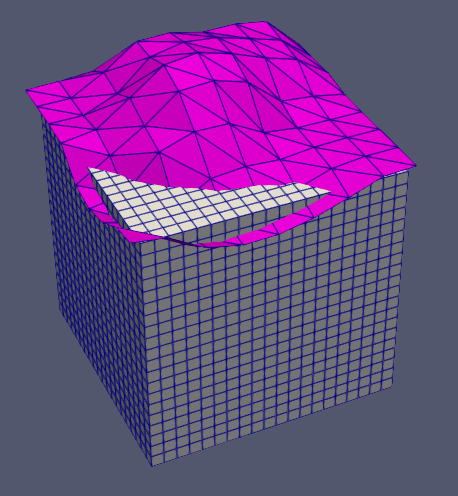
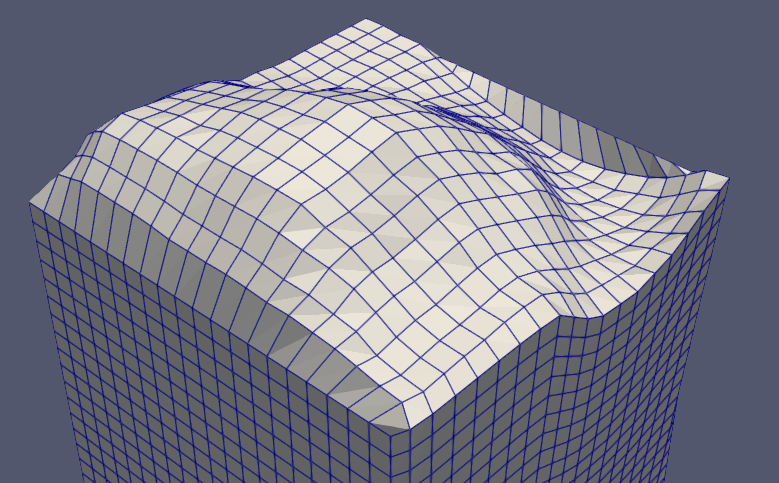
We have this simple box and we want to project one side of it to that pretty pink triangulated surface:
Faces
We’ll simply say box.project_side("top", "roof"). Which side you’ll project – of course – depends on how you placed the box.
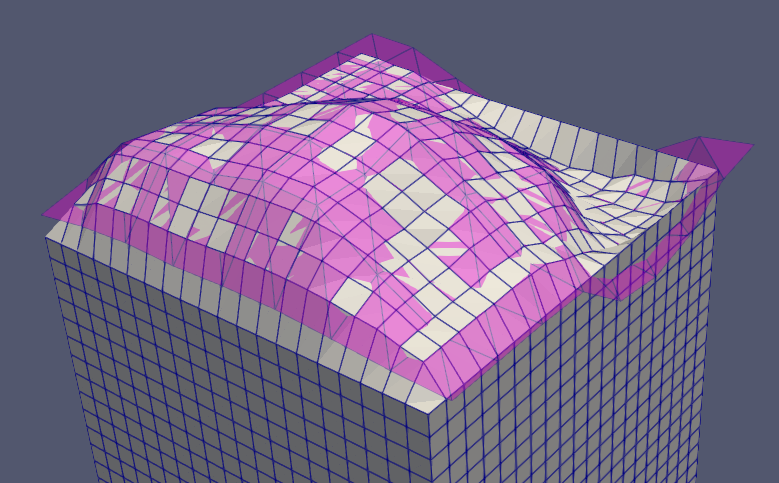
It sort-of does the job but if you take a closer look, edges and vertices didn’t move. This not only doesn’t conform to our geometry but also created very bad – stretched – cells near those edges. We should project edges to that ‘roof’ as well.
Edges
If you want to project a specific edge, you can do box.project_edge(0, 1, "roof"). Again, the numbers denote start and end vertex of the edge and that depends on how you placed the box. And voila, the edge is now projected to our surface!
Alas, that is still not what we want. Projections in blockMesh work by finding the closest point on the surface and moving selected points there. In this case, closest points are not in the same plane so the whole side of our box is deformed.
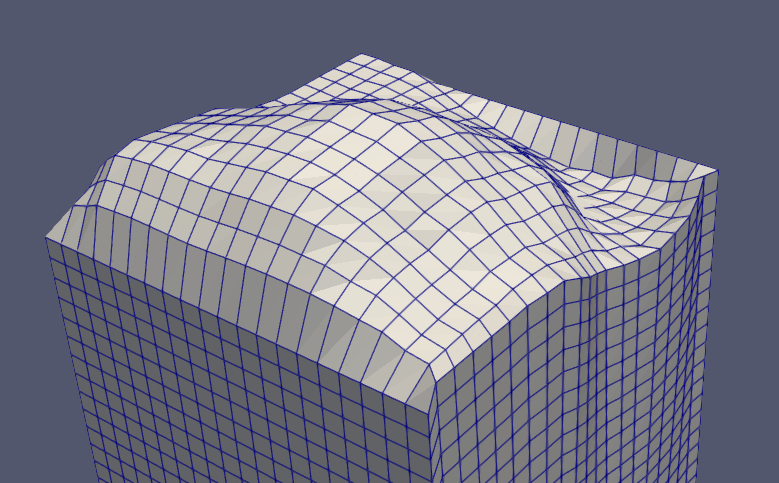
There’s a remedy to that: we can project the edge to an intersection of two surfaces. We’ve already defined a plane so let’s project this edge to both:
box.project_edge(0, 1, [“terrain”, “front_wall”])
box.project_edge(0, 1, ["terrain", "front_wall"])
There we have it! An edge, projected in only one plane, as desired.
Still, if you take a closer look, our box corners are still at the same spot so those cells have a great potential to lose quality when creating a finer mesh with given surface. We should project those as well.
Vertices
Projecting a Vertex to a geometry will move it in any direction – the only goal is finding the closest position on given surface. Similar to edges, you can project them to an intersection of two surfaces or even three. The latter case will fix their point precisely. However, in source code of this feature there’s a comment that this is a work-in-progress so there might be some hidden bugs.
box.project_corner(0, ["roof", "left_wall", "front_wall"])
Everything At Once…
If we wanted to project a block face, including its edges and vertices, we’d have to write 9 box.project_<something>() calls. Here, classy_blocks gives you a shortcut: you can specify operation.project_side(geometry, edges=True, points=True) and it’ll snap edges and vertices to specified geometry. However, if you want to project entities to intersections of surfaces, you’ll still have to specify those by hand.
…Or One at a Time
If you project an edge to a single surface and then project the same edge to a different surface, it will not be replaced, but added to the list.
This will (already has) prove very handy when building somewhat complicated geometries where you don’t have all the data available all the time. For instance, you create a channel from straight blocks, then project left edges to left surface and top edges to top surface. Some edges will be projected to both left and top because that’s the way channels are made… And you don’t have to worry about that at all!
Conclusion
That’s it for now! Be back soon, there’s more to come!