This is the 5th part of the classy_blocks tutorial. It covers some miscellaneous goodies but you should really know the basics before jumping into the former.
Debugging with classy_blocks
blockMesh requires everything in your mesh to be perfectly in order to run at all – vertices, blocks, grading, counts, etc. If you miss anything, it will throw fatal errors at you and you will have to sniff out what went wrong. That’s difficult enough with plain blockMeshDicts but quite impossible with a mesh you didn’t even write by hand. To see what’s going on, you can specify debug_path="." to mesh.write(). It will create a VTK file where every block is a single cell. It doesn’t include cell counts and edges, just pure hexahedras – but it really doesn’t care how deformed they are.
You can then open that file in ParaView and choose to color them by block_ids, or simply inspect cell ID in spreadsheet view. This will quickly reveal problems with degenerate blocks or disconnected neighbours and so on.
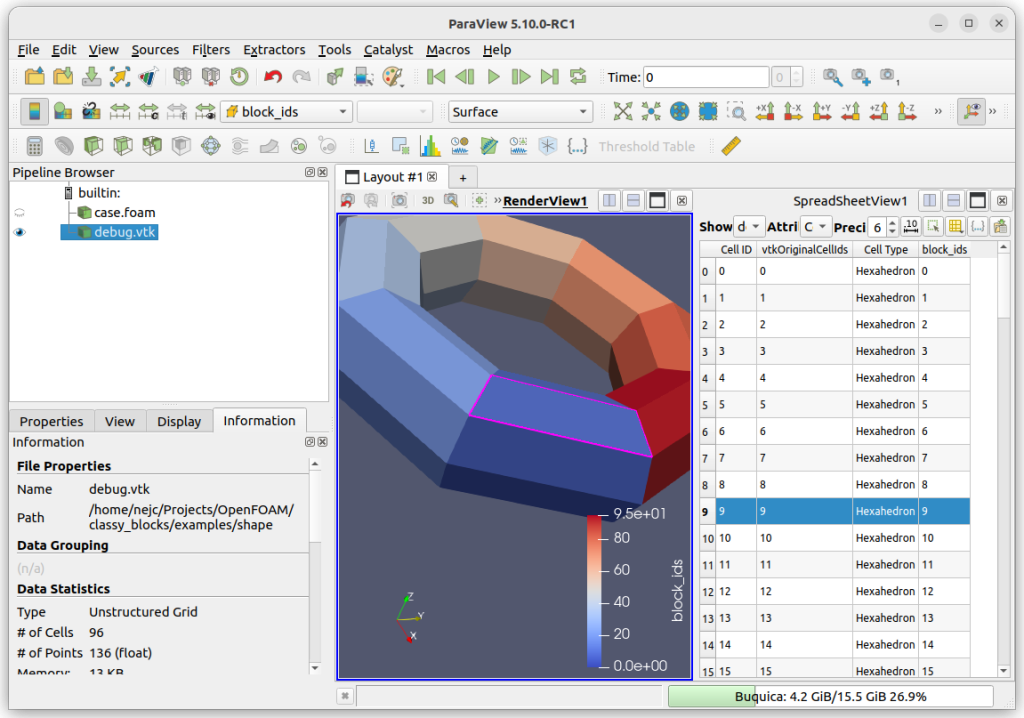
One more thing, ParaView merges coincident block faces into a single solid so you can’t see internal blocking structure. If you want to do that, you can apply the Shrink filter. If you use a high shrink ratio (say, 0.99), you can display the result as Wireframe and get a nice… well, wireframe of your blocking.
Transformations
At this moment, the following transformations of entities are available:
- Translate by a given vector
- Move to a specified location
- Rotate by an angle around given axis and origin
- Scale around a point
You can use all these transformations on all entities:
- Point and Vertex objects
- Faces
- Operations: Box, Extrude, Loft, Revolve, Wedge, …
- Shapes: Elbow, Frustum, Cylinder, Rings, …
When you transform an entity, you change its position/orientation/scale/whatever. If you want to carry out more than one transformation on the same entity, you can daisy chain functions like so:
box = Box(...).translate(...).rotate(...)
In case you want to transform an object but keep the original, make a copy of it:
new_box = box.copy().translate(...)
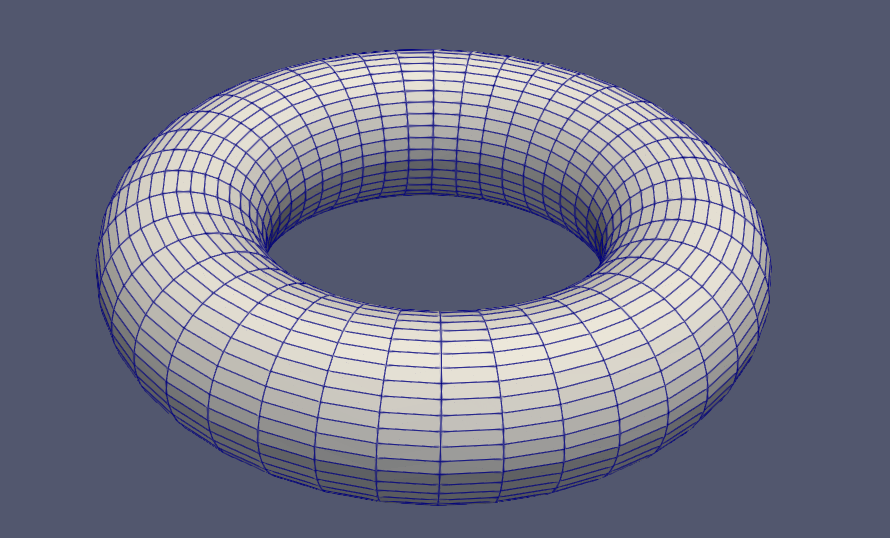
Here’s how to make a torus:
import classy_blocks as cb
import numpy as np

mesh = cb.Mesh()

inner_radius = 0.3
outer_radius = 0.6

n_segments = 8
n_cells = 5

sweep_angle = 2 * np.pi / n_segments

elbow = cb.Elbow(
    [inner_radius + (outer_radius - inner_radius) / 2, 0, 0], # center_point_1
    [inner_radius, 0, 0], # radius_point_1
    [0, -1, 0], # normal_1
    -sweep_angle,
    [0, 0, 0], # torus center
    [0, 0, 1], # torus axis
    (outer_radius - inner_radius) / 2, # radius_2 (same as radius_1)
)

elbow.chop_tangential(count=n_cells)
elbow.chop_radial(count=n_cells)
elbow.chop_axial(count=n_cells)
mesh.add(elbow)

for i in range(1, n_segments):
    segment = elbow.copy().rotate(-i * sweep_angle, [0, 0, 1], [0, 0, 0])
    mesh.add(segment)

mesh.set_default_patch("walls", "wall")
mesh.write("system/blockMeshDict", debug_path="torus.vtk")
Axisymmetric cases: Wedge
If you’re working on an axisymmetric case, you’re essentially creating a 2D geometry except that it’s additionally complicated by that revolved wedge patches.
classy_blocks lets you create wedge geometry simply by specifying faces in XY plane. The rest is automatic: a 2-degree revolve around x-axis, wedge_front and wedge_back patches and chopping in revolved direction.
Face merging
Real-world geometries are often difficult to block properly, if not impossible. Sometimes a simple connection between two non-conforming blocks will save the day (but more probably a few weeks or so).
blockMesh lets you do that but you have to manually duplicate vertices that would otherwise be shared between the two merged faces. Then you specify a pair of patches that will be merged.
With classy_blocks, you only have to do mesh.merge_faces(...) and the rest will be handled automatically.
Keep in mind that once you do that, most faces of merged cells will gain new vertices, which will make previously hexahedral cells polyhedral, thus breaking the pure-hexa rule. Pious believers frown upon using anything else than pure hexahedral meshes… but since engineers are often just happy with π = e = √g, a mesh that does the job will be just fine too. Even if it’s not fanatically religious.
Keep in mind that if you want to use this mesh as a background for snappyHexMesh, this won’t work since snappy will crash the very moment it meets anything but a hexahedron.
Automatic Point Sorting
Two scenarios are common here:
- blockMesh whines about inside-out blocks and you’re too lazy to find out where is the problem
- classy_blocks created blocks for you and now you have no idea where their tops and bottoms are.
There are many ways to remedy that but at the moment of writing this classy_blocks tutorial an re-orienter object based on viewpoint is available: ViewPointReorienter. It takes two arguments: a point where you – the viewer – sit, and another point approximately above the block you want to reorient. It will then change points’ positions so that front block side will face you, top will point upwards, bottom down and left and right and back accordingly.
A Reorienting Example
See this labyrinth that could represent a periodic channel for a microfluidic case:
It can be built very easily like this:
face = cb.Face([[0, 0, 0], [1, 0, 0], [1, 1, 0], [0, 1, 0]]) # a Face in x-y plane
extrude = cb.Extrude(face, 1)
extrudes.append(extrude)

for side in ("top", "right", "top", "top", "left", "top"):
    face = extrude.get_face(side)
    normal = f.unit_vector(face.center - extrude.center)
    extrude = cb.Extrude(face, normal)
It is built from a single extruded face at the bottom of the white block, then taking top/right/left/etc. face of each subsequent extrude. Since extrude is always made from bottom to top face (internally), the blocks created are all oriented differently, depending on their initial face: the green block’s top face points right, the pink to the left, and so on. This is technically sound but clumsy to work with. It would be better if up was up for all blocks regardless of how they were made, right? So let’s do it.
We view this mesh like in the image but from far away:
front_point = f.vector(20, -100, 0)
above_point = f.vector(0, 0, 100)
orienter = cb.ViewpointReorienter(front_point, above_point)
Then it’s all very simple, just do orienter.reorient(extrude) for each block.
Keep in mind a few things. The algorithm uses scipy’s ConvexHull to connect 8 vertices with 12 triangles. Then it sorts them so that their normals align as well as possible with those defined by orienter’s viewpoint. This is probably not the most robust way of doing this. However, if your blocks are so crooked that even this fails, you should maybe reconsider your blocking scheme once again. Also, blocks where opposite faces form angles of 90 or more degrees will most probably confuse this algorithm as well.
Happy blocking until the next tutorial!